Front panel

From left-to-right:
- Front panel switch. This is sprung to return to the centre position. Nudge it up to turn off the simulation (turning the box into a standard headphone amplifier). Nudge it down to turn the simulation on (which it is by default). Nudge it down repeatedly to switch between the different listening modes.
- Screen. In the photograph, this shows meter mode with no signal present. The icon on the bottom right shows that the simulation is running in ‘Music’ mode (the default setting).
- Volume control. This is an analogue control, so there won’t be any nasty surprises if the firmware misbehaves.
- USB host port. Only for a head tracker: it definitely won’t recharge your phone.
- Headphone output. On a standard quarter-inch stereo jack.
Back panel

From left-to-right:
- DC input jack. Accepts standard 2.1mm DC adapters. 9-12 volts, centre-pin positive polarity. 500mA will be adequate (although more powerful adapters will also work).
- On-off switch. Shown here in ‘on’ position.
- Right and left analogue balanced input jacks. The amplifier is also supplied with RCA adapters in case that’s what you prefer.
- Micro USB port. Used only for upgrading firmware.
- Back panel switch. This is sprung to return to the central position. Nudge it up to zero the head tracker. Nudge it down to toggle through the front-panel screen modes.
Screens
There’s a lot going on inside this device, which is why the prototype has a screen. The three main screens — meter, attitude, and info — can be cycled through while the amplifier is running by repeatedly clicking the rear switch down.
 Start screen
You will catch a glimpse of this every time you turn the unit on and, if all goes well, it will disappear almost immediately. This screen shows the device going through its power-on sequence. Red means ‘error’ or ‘not yet done’ and green means ‘OK’. The squares on every row should turn green in sequence within the first few hundred milliseconds. If one gets stuck on red, and you find yourself looking at this screen for longer than about a second, there’s a problem that you need to speak to me about.
 Meter screen
The four meters show the left, right, stereo middle (sum of left and right) and stereo side (difference of left and right) levels of the audio input.
The scale is in dB FS (decibels with respect to the full-scale digital level). This means that the device will clip when the left and right meters hit zero. You should set the input level to the amplifier, if you can, so that the maximum level is a little under 0dB FS.

If the meters aren’t working and the screen says ‘DSP Error!’ (as above), it indicates that the sound level data isn’t getting to the display because the DSP firmware has probably crashed. You may need to re-attempt an upgrade. You should not see this message unless you’re me.
 Attitude screen (v1.00-v1.02)
This was a placeholder screen until I developed a prettier one. It just proves that sensible head tracker data is coming through: the bar graphs will fluctuate gently as you move your head.
 Attitude screen (v1.03+)
The new attitude screen shows head orientation in a more direct way.
 Info screen
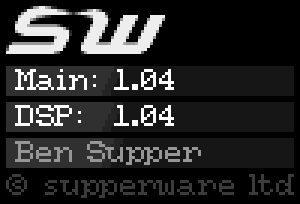
Any self-respecting prototype needs an info screen.
The screen handily reminds you what your name is (it will appear instead of mine), and tells you the currently-installed versions of the main and DSP firmware.
 Bootloader screen
You will see the bootloader screen only if you are actively upgrading the amplifier. See the section below on updating firmware.
Should anything go wrong during the upgrade process, the unit might play dead, or show this screen when you turn it on and refuse to do anything else. If this happens, it’s pretty-much-always possible to recover by activating the bootloader manually. Again, see the section below on updating firmware.
Listening modes
If you have been used to the software simulation for the last eighteen months or so, I have remodelled the listening environments. They are more distinctive, and the quality has been greatly improved.
Provided the front panel is showing either the meter or attitude display, an icon in the bottom-right-hand corner of the screen will tell you which listening mode you’re in.
-

Dialogue mode. This simulates a smallish, heavily-damped room. Dialogue mode is best for listening to speech, which requires clarity and suits a dry ambience. 
Music mode (the default). This provides a balance between the detail and ambience of the other settings, which suits most music.
Concert mode. This simulates loudspeakers about 3 metres away in a fairly large, live acoustic. Concert mode nicely complements any music recorded in a concert hall.
The fourth listening mode is nudging the switch up to turn the simulation off: this just plays the left channel in the left ear and the right channel in the right ear, so it’s the same as listening through headphones on any other device.
The differences between the modes can be most starkly compared by unplugging or muting one of the stereo channels, and playing speech through the other one.
Plugging in a head tracker
The USB port on the front of the unit is for plugging in a head tracker. The amplifier will work without it, but the simulation will stay centred and will not, of course, respond to your head movements.
This amplifier cannot charge or communicate with anything other than an Issue 3 or Issue 4 head tracker, and it’s not recommended that you try plugging anything else into the USB socket to test this statement. Bad things are very unlikely to happen, but I wouldn’t want to take responsibility.
You’ll know if you have an Issue 3 head tracker because I’ll have provided it especially for this purpose. Issue 4 head trackers don’t yet exist, and won’t exist until July 2020.
If your head tracker is successfully connected, a ‘t’ icon will appear alongside any others on the bottom-right corner of the screen:
![]()
The ‘attitude’ display will also update dynamically, to reassure you that the head tracker is working. To zero it (in other words, to centre it when you’re comfortable with your head position), either press the button on the head tracker itself, or flick the rear switch up.
Updating the firmware
Occasionally I will publish a firmware update for these boxes. You will need to connect the Micro USB socket on the rear of the amplifier to a PC or Mac. Instructions for downloading and using the update will be provided on another page.
It is recommended that you unplug your headphones during a firmware upgrade, or at least take them off. There is sometimes a ‘pop’ when restarting after an upgrade that can be fairly loud.
It’s almost impossible to brick a unit by messing up a firmware update, but you may render the unit apparently inoperable. If this happens, turn the amplifier off at the power switch, and hold the front switch down as you’re turning the power back on. You should see the bootloader screen, and this will enable you to try the upgrade again.